Ah, well... it was worth a try. I think the Linux tools are more powerful, but a little more complicated to use. You may be familiar with the command tool called
fdisk... and we're going to use that briefly, but then we will use a different tool called
gdisk. You may have to install that first. If you have a Debian/Ubuntu based Linux, use
sudo apt install gdisk.
I happened to test on a USB that had a similar problem with overlapping blocks... see my report below. This may be different from the error you had. This USB was working fine though, even with the overlapping blocks. So, as I said before, that wasn't the serious part of your problem, I don't think.
OK, here we go. Please read through a time or two to get a feel for what we're doing. You have to follow each step carefully, but you should be able to start again from the beginning if there is any issue. I am very hopeful that we fix your USB this time and not turn it into a brick... but anything is possible. If the USB does not respond to these instruction, I don't think I have any other ideas. Everything below is from a Linux command line ((comments in parentheses, like before)):
1. Install gdisk, if not already installed
2. sudo fdisk -l ((to identify your drive... mine is /dev/sdg and I will use that in my examples))
3. sudo umount /dev/sdg1 ((unmount the partition, if it was automounted when plugged in))
sudo umount /dev/sdg2 ((just in case, since you have 2 partitions on the USB))
4. sudo gdisk /dev/sdg ((this is where my errors showed in the screen above))
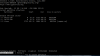
5. You are now in the gdisk menu... it looks like this shown below:
6. Command (? for help): x ((enter x to put gdisk in eXpert mode))
7. Expert Command (? for help): z ((enter z to Zap the drive... this bricks it when you answer Y below))
8. About to wipe out GPT on /dev/sdg. Proceed? (Y/N): y
9. Blank out MBR? (Y/N): y
10. You are now back at terminal prompt after gdisk exits by itself.
11. sudo gdisk /dev/sdg ((running gdisk again... don't need eXpert mode this time))
12. Command (? for help): p ((will show drive info, but this is not necessary))
13. Command (? for help): n ((for New partition))
14. ((Accept the defaults for Partition 1, First sector, and Last sector, then enter 0700 where it asks for Hex code or GUID. Hex code 0700 is "Microsoft Basic Data".))
15. Command (? for help): w ((write the new partition table to disk and exit))
16. Next, hit Y when asked to Proceed creating a new GPT partition table ((yes, this is gdisk, not fdisk, so it makes GPT partition table))
17. Now, you are back at terminal prompt, and you need to create the filesystem...
18. sudo mkfs -t ntfs /dev/sdg1 ((for NTFS or...))
sudo mkfs -t vfat /dev/sdg1 ((for FAT32... I usually prefer FAT32 in most cases))
Okay... I think that's it (if I didn't make any mistakes copying my notes). After all these steps, look at your USB with Gparted. In my case, it "named the partition" something like, "Microsoft Basic Data" but Gparted will let you name it something else, or just delete that name. You don't have to unmount to change the name. When I run gdisk again on the drive (sudo gdisk /dev/sdg)... after it is unmounted... my errors are gone, as shown here:
It's a lot easier to go through and do these steps than it is to read them! Or write them! It really isn't too hard of a process, and it has almost always worked for me to recover USB drives that have been messed up by .iso burning programs. But sometimes the drives can be already badly damaged, and so it is possible that even all of this will fail. But good luck... I hope that it works!

Cheers