Cloning the entire disk - failure to boot

etcetera

Active Member
Joined
Mar 10, 2024
Messages
147
Reaction score
34
Credits
1,756
I have Redhat 9 installed on a SSD, which is 22100, 22mmx100mm size. The machine I want it on only takes 2280 size SSDs.

I tried cloning with every method I could think of. First with Macrium Reflect, it's a Windows tool which has cloned disks for me for over a decade, works nicely. But not here. The newly created clone doesn't boot due to some grub thing. The machine has 4 disks. I did it by booting into Windows, then cloning one disk to another disk.

I tried cloning from inside Redhat, using dd, pointing to the target disk. The same thing. It should work, if it made a perfect bit by bit copy, why in the world would the clone not boot?

I tried cloning some other tool like EaseUS also to no avail.


The machine I want it on only takes 2280 size SSDs.
The size of the ssd does not matter. There is no need for it to be secured by screws.There are no moving parts inside a ssd, so therefore it does not move when it is working. It just sits there. I actually put a piece of paling under mine.


Windows tools will never work on Linux.

However, there are some Linux tools that will work on windows.

Rescuezilla is one of them

Rescuezilla

It has a lot going for it, so is well worth spending time to read it.

I use it, both for backups (monthly) and as recently as last week for cloning (perfect result)
 
Foxclone will clone the Drive...https://foxclone.org/

m1212.gif
 
I would stick the 22100 in the machine but it physically does not fit. It's an odd server size SSD and I need the OS moved to 2280
PCIe/NVME SSD which is very common and can fit anywhere.
I will try the above tools.

I think the problem is not that it's not cloning the drive but the machine gets confused with grub stuff, somehow.
 
what exactly is the "focal" version?

  • Download the ISO for the standard version (649MB). The md5sum for the standard version is:
  • Download the ISO for the focal version (972MB). The md5sum for the focal version is:
 
I think the problem is not that it's not cloning the drive but the machine gets confused with grub stuff, somehow

grub wants a specific device path. The nvme device path is different from your SSD path.
This can be fixed, the hard part is knowing the right path.
 
what exactly is the "focal" version?

  • Download the ISO for the standard version (649MB). The md5sum for the standard version is:
  • Download the ISO for the focal version (972MB). The md5sum for the focal version is:

On the download page it says...The focal version, based on ubuntu 20.04, has a 5.15 kernel and is intended for newer PCs.

I always download the standard version even though my Motherboard and CPU are only 6 mths old...I might try the focal version myself.
m1213.gif
 
foxclone went absolutely nowhere, it's a dud:

I could not create a bootable flash drive with redhat 8.9 so ended up creating a bootable DVD with a redhat tool.
booted off that and started foxclone and got this. Once I clicked on the "Virtual device" pop-up, the entire thing shut down. Tried it several times to avail. The other window was hung at the "Finding partitions..." stage forever if I did nothing. So it went nowhere. I looked at other options in the software, like gparted, they didn't have cloning capability.
 

Attachments

  • photo_2024-03-15_19-18-47.jpg
    photo_2024-03-15_19-18-47.jpg
    167.5 KB · Views: 45
  • photo_2024-03-15_19-18-44.jpg
    photo_2024-03-15_19-18-44.jpg
    142.8 KB · Views: 44
I followed this page, it looked promising but ultimately also went nowhere, in fact made the system unbootable just like the warning said.


Posting the entire thing as there is a stupid Redhat login wall.


This worked well: (except my device file names are /dev/nvme0n1 and /dev/nvme1n1)
sfdisk -d /dev/vda | sfdisk --force /dev/vdb

The second command chocked, even with the -f flag (It tries to put the LVM disk header into onto the SSD).

pvcreate /dev/vdb2
I had to clean out the disk with the wipefs -a /dev/nvme1n1 command and then pvcreate worked.

then dd. I did not umount /boot, why would I have to do that? The dd ran for about 40 mins and appeared with no errors.
# umount /boot/
# dd if=/dev/vda1 of=/dev/vdb1 bs=512 conv=noerror,sync
# mount /boot

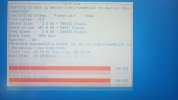
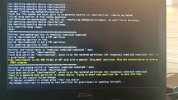
Then upon the reboot, I got stuck at the dracut prompt. To make things worse, the source SSD also got stuck at the dracut prompt. Neither the target nor the source were bootable anymore. I had to take out the source SSD, stick in a Win10 SSD, go into diskpart and wipe out all the partitions on the target SSD. Then installed the source Redhat SSD and it booted fine.
No idea why that is but not the first time. Don't get how something on the target SSD can prevent the source SSD from booting.

Anyway, back to square one.
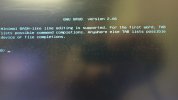
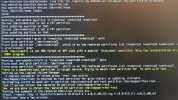
the data appears to get copied just fine but I get the grub error, such as this one (third image attached).

Following the directions below, when running

grub2-install /dev/nvme1n1

grub2-install: error: /usr/lib/grub/x86_64-efi/modinfo.sh doesn't exist. Please specify --target or --directory.

I already have the grub2-efi-modules so not sure what else that it needs

but because the RHEL 8.9 system is not registered, it disabled all dnf/yum updates and I would have to install a package manually, offline with the repotrack command. And I am contemplating if I should go down that rabbit hole (with the feeling it won't work anyway) or just forget the whole thing and reinstall the OS on the correct SSD.

Cloning a SSD should not be that difficult, geez, I have been trying for weeks, on and off. I was under the impression that dd did the entire disk, bit by bit and that was it.


____________________________________________________________


Migrate standard RHEL installation from one hard disk to another​

Latest response March 8 2022 at 9:56 AM
* DON'T DO ANY OF THIS, AS YOU WILL ALMOST CERTAINLY WRECK YOUR SYSTEM IF YOU DO! *
You have one standard installation of RHEL, you need migrate the installation from one hard disk to another, this is required due to technology improvement.
The server is productive and has running critical services, so is important minimize the migration window, this procedure requires only one reboot, if you want to apply all changes immediately but you can program the restart after.
For x86_64
Scenario:
Raw
vda -> Old Disk
vdb -> New Disk
centos -> root volume group

Partitioning:
Raw
# df -h
Filesystem Size Used Avail Use% Mounted on
/dev/mapper/centos-root 18G 983M 17G 6% /
devtmpfs 487M 0 487M 0% /dev
tmpfs 497M 0 497M 0% /dev/shm
tmpfs 497M 6.7M 490M 2% /run
tmpfs 497M 0 497M 0% /sys/fs/cgroup
/dev/vda1 497M 164M 333M 33% /boot
tmpfs 100M 0 100M 0% /run/user/0
tmpfs 100M 0 100M 0% /run/user/1000

Raw
# fdisk -l
Device Boot Start End Blocks Id System
/dev/vda1 * 2048 1026047 512000 83 Linux
/dev/vda2 1026048 41943039 20458496 8e Linux LVM

Steps:
Clean yum cache:
Raw
# yum clean all

Clone partitioning scheme:
Raw
# sfdisk -d /dev/vda | sfdisk --force /dev/vdb

Move Logical Volume to new disk:
Raw
# pvcreate /dev/vdb2
# vgextend centos /dev/vdb2
# pvmove /dev/vda2
# vgreduce centos /dev/vda2
# pvremove /dev/vda2

Clone /boot:
Raw
# umount /boot/
# dd if=/dev/vda1 of=/dev/vdb1 bs=512 conv=noerror,sync
# mount /boot

Copy boot sector:
Raw
# dd if=/dev/vda of=/dev/vdb bs=1 count=512

Install GRUB in new disk:
Raw
# grub2-install /dev/vdb

Sync changes:
Raw
# sync

Reboot your physical or virtual machine, please make sure that your new disk is the default boot device or remove old disk but don't delete data, can be useful in a rollback situation.
For POWER
Scenario:
Raw
sda -> Old Disk
sdb -> New Disk
ca -> root volume group

Partitioning:
Raw
# df -h
Filesystem Size Used Avail Use% Mounted on
/dev/mapper/ca-root 28G 1.1G 27G 4% /
devtmpfs 449M 0 449M 0% /dev
tmpfs 495M 0 495M 0% /dev/shm
tmpfs 495M 12M 484M 3% /run
tmpfs 495M 0 495M 0% /sys/fs/cgroup
/dev/sda2 497M 143M 354M 29% /boot
tmpfs 99M 0 99M 0% /run/user/0

Raw
# fdisk -l
Device Boot Start End Blocks Id System
/dev/sda1 * 2048 10239 4096 41 PPC PReP Boot
/dev/sda2 10240 1034239 512000 83 Linux
/dev/sda3 1034240 62914559 30940160 8e Linux LVM

Steps:
Clean yum cache:
Raw
# yum clean all

Clone partitioning scheme:
Raw
# sfdisk -d /dev/sda | sfdisk --force /dev/sdb

Move Logical Volume to new disk:
Raw
# pvcreate /dev/sdb3
# vgextend centos /dev/sdb3
# pvmove /dev/sda3
# vgreduce centos /dev/sda3
# pvremove /dev/sda3

Clone PPC PReP Boot partition:
Raw
dd if=/dev/sda1 of=/dev/sdb1 bs=512 conv=noerror,sync

Clone /boot:
Raw
# umount /boot/
# dd if=/dev/sda2 of=/dev/sdb2 bs=512 conv=noerror,sync
# mount /boot

Copy boot sector:
Raw
# dd if=/dev/sda of=/dev/sdb bs=1 count=512

Install GRUB in new disk:
Raw
# grub2-install /dev/sdb

If you receive this message: grub2-install: error: the chosen partition is not a PReP partition. maybe you can try with:
Raw
# grub2-install /dev/sdb1

Sync changes:
Raw
# sync
 

Attachments

  • photo_2024-03-15_19-32-08.jpg
    photo_2024-03-15_19-32-08.jpg
    90.4 KB · Views: 33
Last edited:
This got me the same error as above:

grub2-install --target=arm64-efi --efi-directory=/boot/efi --bootloader-id=grub2
 
foxclone went absolutely nowhere, it's a dud:

I could not create a bootable flash drive with redhat 8.9 so ended up creating a bootable DVD with a redhat tool.
booted off that and started foxclone and got this. Once I clicked on the "Virtual device" pop-up, the entire thing shut down. Tried it several times to avail. The other window was hung at the "Finding partitions..." stage forever if I did nothing. So it went nowhere. I looked at other options in the software, like gparted, they didn't have cloning capability.

It's only a "dud" for those who have no idea whatsoever what they're doing...need I say more.
1710553264782.gif
 
Clonezilla did it for me, what a nice tool. The user interface is a bit OCD but I was able to navigate through it. Cloned the OS perfectly, the partition table, the LVM, grub stuff. It just boots and works.
I accidentally overwrote my clone with something else and cloned it a second time, also with no issues, this time selecting large font. Which should really be the default.
I am going to keep a permanent flash drive with Clonezilla on it as a tool in the arsenal.

I wonder if it will clone Win10 SSDs which I need cloned from time to time.
 

Attachments

  • photo_2024-03-17_14-02-16.jpg
    photo_2024-03-17_14-02-16.jpg
    112.3 KB · Views: 39
  • photo_2024-03-17_14-01-58.jpg
    photo_2024-03-17_14-01-58.jpg
    168.3 KB · Views: 43
  • photo_2024-03-17_14-01-43.jpg
    photo_2024-03-17_14-01-43.jpg
    202.9 KB · Views: 42
All thanks to you, really.

I had to do just one more thing. The source disk is 1TB. The target is 2TB.

The image on the 2TB disk is 1TB, everything. The main Volume Group has no free space. I read the entire LVM handbook and could not find this exact scenario. Granted, it's uncommon.

This is where gparted came in handy, resized it rather effortlessly. What a great tool. I used it before on some Windows stuff but it works great resizing partitions. It is a great multipurpose tool.

Does gparted have a log file of what it did? I would love to see the command line stuff.

Alternatively, I saw this but a bit reluctant to try it and why, when you have gparted.
I am worried that a key step was missed, step 1 is go to the single user mode since I can't unmount "Everything attached to the device" in multiuser mode. This is the main volume group.

1.) umount everything attached to the device /dev/xxx
2.) run: pvresize /dev/xxx
3.) run: pvs to validate that it was expanded
4.) run: lvresize -L+[replace with some size] vgname/lvnname /dev/xxx
5.) run: lvs to validate
6.) Reboot or remount (mount -a) from fstab
 
Last edited:
Code:
root@lib:~# fdisk -l | grep Disk | grep dev
Disk /dev/nvme0n1: 1.8 TiB, 2000398934016 bytes, 3907029168 sectors
Disk /dev/nvme1n1: 1.8 TiB, 2000398934016 bytes, 3907029168 sectors
Disk /dev/sda: 1.8 TiB, 2000398934016 bytes, 3907029168 sectors
Disk /dev/mapper/rhel-root: 465.7 GiB, 500002979840 bytes, 976568320 sectors
Disk /dev/mapper/rhel-swap: 16 GiB, 17179869184 bytes, 33554432 sectors
Disk /dev/mapper/rhel-var: 200 GiB, 214748364800 bytes, 419430400 sectors
Disk /dev/mapper/rhel-home: 93.1 GiB, 100000595968 bytes, 195313664 sectors
root@lib:~#
root@lib:~# pvs
  PV             VG   Fmt  Attr PSize PFree 
  /dev/nvme1n1p3 rhel lvm2 a--  1.55t 815.66g
root@lib:~#
root@lib:~# vgs
  VG   #PV #LV #SN Attr   VSize VFree 
  rhel   1   4   0 wz--n- 1.55t 815.66g
root@lib:~#
root@lib:~# lvs
  LV   VG   Attr       LSize   Pool Origin Data%  Meta%  Move Log Cpy%Sync Convert
  home rhel -wi-ao----  93.13g             
  root rhel -wi-ao---- 465.66g
  swap rhel -wi-ao----  16.00g
  var  rhel -wi-ao---- 200.00g                 
root@lib:~# vgdisplay -v | grep -i Free
  Free  PE / Size       208809 / 815.66 GiB
  Total PE / Free PE    407157 / 208809
root@lib:~#
 
Notes:

Clonezilla is a great tool.

gparted is a great tool. I've used gparted before, just not for this specific task. These both deserve to be permanently attached to a flash drive.
 
Code:
root@lib:~# df -h | head
Filesystem             Size  Used Avail Use% Mounted on
devtmpfs                16G     0   16G   0% /dev
tmpfs                   16G     0   16G   0% /dev/shm
tmpfs                   16G   11M   16G   1% /run
tmpfs                   16G     0   16G   0% /sys/fs/cgroup
/dev/mapper/rhel-root  800G  418G  383G  53% /
/dev/mapper/rhel-home   94G   33G   61G  35% /home
/dev/nvme1n1p2         3.0G  570M  2.5G  19% /boot
/dev/mapper/rhel-var   200G   28G  172G  15% /var
/dev/nvme1n1p1         2.0G  5.8M  2.0G   1% /boot/efi

root@lib:~# lvextend -L 850G /dev/mapper/rhel-root
  Size of logical volume rhel/root changed from 800.00 GiB (204800 extents) to 850.00 GiB (217600 extents).
  Logical volume rhel/root successfully resized.

root@lib:~# xfs_growfs /dev/mapper/rhel-root
meta-data=/dev/mapper/rhel-root  isize=512    agcount=7, agsize=30517760 blks
         =                       sectsz=512   attr=2, projid32bit=1
         =                       crc=1        finobt=1, sparse=1, rmapbt=0
         =                       reflink=1    bigtime=0 inobtcount=0
data     =                       bsize=4096   blocks=209715200, imaxpct=25
         =                       sunit=0      swidth=0 blks
naming   =version 2              bsize=4096   ascii-ci=0, ftype=1
log      =internal log           bsize=4096   blocks=59605, version=2
         =                       sectsz=512   sunit=0 blks, lazy-count=1
realtime =none                   extsz=4096   blocks=0, rtextents=0
data blocks changed from 209715200 to 222822400

root@lib:~# df -h | head
Filesystem             Size  Used Avail Use% Mounted on
devtmpfs                16G     0   16G   0% /dev
tmpfs                   16G     0   16G   0% /dev/shm
tmpfs                   16G   11M   16G   1% /run
tmpfs                   16G     0   16G   0% /sys/fs/cgroup
/dev/mapper/rhel-root  850G  418G  433G  50% /
/dev/mapper/rhel-home   94G   33G   61G  35% /home
/dev/nvme1n1p2         3.0G  570M  2.5G  19% /boot
/dev/mapper/rhel-var   200G   28G  172G  15% /var
/dev/nvme1n1p1         2.0G  5.8M  2.0G   1% /boot/efi

# vgdisplay -v | grep -i Free

  Free  PE / Size       97619 / 381.32 GiB
  Total PE / Free PE    407157 / 97619
 

Staff online

Members online


Top