70 Tango Charlie
Well-Known Member
MODERATOR NOTE - THIS THREAD UNDER CONSTRUCTION - FINISHED SOON
______________________________________________________________________________
This tutorial is demonstrating the installation of Linux Mint 19.3 Mate on a HP Laptop 15-bs2xx. It has 4 gb ram and 500 gb Hard Drive.
Things you will need: One Flash Drive – at least 4 GB, a Linux Mint 19.3 mate iso file, and a lot of patience.
Stage 1
First, go to Distrowatch.com and locate ‘Mint’ on the right side of page. Click on it. In the window that opens, scroll down to ‘Distribution Release: Linux Mint 19.3. Click on that, which takes you to this window:

Click on ‘19.3-mate-64bit.iso’. This window then opens:

Click on ‘Distribution Release: Linux Mint 19.3’

It will now begin downloading, after it asks you what you want to do with it. Click on ‘Save’. It will be saved in the ‘Downloads’ folder.
Next step is to download ‘Etcher’. This program will ‘Burn’ your iso file onto a ‘USB Flash Drive’. Go to ‘Etcher.com’ to download.
 www.balena.io
Start ‘Etcher’ and follow directions listed.
View attachment 5660
Select the Linux Mint 19.3 iso image from your downloads folder. The Adata USB is the flash drive I used, yours’ will probably be different. Total time for this operation should be no more than 6 minutes. When this is done, leave the Flash Drive in the USB port.
Stage 2
Now you are ready to have your Windows machine recognize your ‘Flash Disk’.
Go to ‘Start’ button {left bottom of screen} and click on it.
View attachment 5661
Next click on ‘Settings’ {small gear on left}
New window opens. Click on ‘Update and Security’.
View attachment 5662
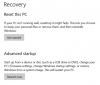
New window opens. Click on ‘Recovery’.
New window opens. Under ‘Advanced Startup’, click on ‘Restart Now’.
View attachment 5663
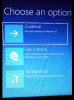
New window opens. Click on ‘Troubleshoot’.
View attachment 5664
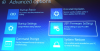
New window opens. Click on ‘UEFI Firmware Settings’.
View attachment 5665
New window opens. Click on ‘Restart’. Next press F10 key.
New window opens. ‘Setup Utility’.
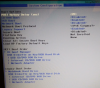
View attachment 5666
Use arrow key to move cursor to ‘System Configuration’ tab.
Press down arrow key to hi-lite ‘Boot Options’.
Press ‘Enter’. ‘System Configuration’ screen opens.
View attachment 5667
Note: Changing the POST Hotkey Delay to 20 will allow more time for you to react, especially on Re-Starts. To change it – while hi-lited press ‘Enter’. Box opens with five choices.
Under ‘Boot Options’
POST Hotkey Delay <sec> set to <20>
CD ROM Boot disabled.
USB Boot enabled.
Network Boot disabled.
Network Boot Protocol IPv4 + IPv6 <UEFI>
Legacy Support enabled.
Secure Boot disabled.
Platform Key Not Enrolled.
Pending Action None
Clear All Secure Boot Keys
Load HP Factory Default Keys
UEFI Boot Order
OS boot manager
USB Diskette on Key/USB Hard Disk.
! USB CD/DVD ROM Drive.
! Internal CD/DVD ROM Drive
! Network Adapter
Legacy Boot Order
Notebook Hard Drive
USB Diskette on Key/USB Hard Disk
! Internal CD/DVD ROM Drive
! USB CD/DVD ROM Drive
! Network Adapter
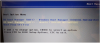
Press F 10 key to save.
Screen will go black. Immediately press and HOLD F 9 key until Boot Manager screen opens.
View attachment 5668
Select your Linux by pressing up or down arrow keys and hi-lite it. {It might say ‘Ubuntu’} then click on your selection.
Ready to install new Linux operating system. Follow onscreen instructions.
View attachment 5670
End of instructions.
____________________________________________________________________________
______________________________________________________________________________
How To Install Linux Mint to Dual Boot With Windows 10
by
Charlie Corder
3-5-2020
by
Charlie Corder
3-5-2020
This tutorial is demonstrating the installation of Linux Mint 19.3 Mate on a HP Laptop 15-bs2xx. It has 4 gb ram and 500 gb Hard Drive.
Things you will need: One Flash Drive – at least 4 GB, a Linux Mint 19.3 mate iso file, and a lot of patience.
Stage 1
First, go to Distrowatch.com and locate ‘Mint’ on the right side of page. Click on it. In the window that opens, scroll down to ‘Distribution Release: Linux Mint 19.3. Click on that, which takes you to this window:
Click on ‘19.3-mate-64bit.iso’. This window then opens:
Click on ‘Distribution Release: Linux Mint 19.3’
It will now begin downloading, after it asks you what you want to do with it. Click on ‘Save’. It will be saved in the ‘Downloads’ folder.
Next step is to download ‘Etcher’. This program will ‘Burn’ your iso file onto a ‘USB Flash Drive’. Go to ‘Etcher.com’ to download.
balenaEtcher - Flash OS images to SD cards & USB drives
A cross-platform tool to flash OS images onto SD cards and USB drives safely and easily. Free and open source for makers around the world.
www.balena.io
Start ‘Etcher’ and follow directions listed.
View attachment 5660
Select the Linux Mint 19.3 iso image from your downloads folder. The Adata USB is the flash drive I used, yours’ will probably be different. Total time for this operation should be no more than 6 minutes. When this is done, leave the Flash Drive in the USB port.
Stage 2
Now you are ready to have your Windows machine recognize your ‘Flash Disk’.
Go to ‘Start’ button {left bottom of screen} and click on it.
View attachment 5661
Next click on ‘Settings’ {small gear on left}
New window opens. Click on ‘Update and Security’.
View attachment 5662
New window opens. Click on ‘Recovery’.
New window opens. Under ‘Advanced Startup’, click on ‘Restart Now’.
View attachment 5663
New window opens. Click on ‘Troubleshoot’.
View attachment 5664
New window opens. Click on ‘UEFI Firmware Settings’.
View attachment 5665
New window opens. Click on ‘Restart’. Next press F10 key.
New window opens. ‘Setup Utility’.
View attachment 5666
Use arrow key to move cursor to ‘System Configuration’ tab.
Press down arrow key to hi-lite ‘Boot Options’.
Press ‘Enter’. ‘System Configuration’ screen opens.
View attachment 5667
Note: Changing the POST Hotkey Delay to 20 will allow more time for you to react, especially on Re-Starts. To change it – while hi-lited press ‘Enter’. Box opens with five choices.
Under ‘Boot Options’
POST Hotkey Delay <sec> set to <20>
CD ROM Boot disabled.
USB Boot enabled.
Network Boot disabled.
Network Boot Protocol IPv4 + IPv6 <UEFI>
Legacy Support enabled.
Secure Boot disabled.
Platform Key Not Enrolled.
Pending Action None
Clear All Secure Boot Keys
Load HP Factory Default Keys
UEFI Boot Order
OS boot manager
USB Diskette on Key/USB Hard Disk.
! USB CD/DVD ROM Drive.
! Internal CD/DVD ROM Drive
! Network Adapter
Legacy Boot Order
Notebook Hard Drive
USB Diskette on Key/USB Hard Disk
! Internal CD/DVD ROM Drive
! USB CD/DVD ROM Drive
! Network Adapter
Press F 10 key to save.
Screen will go black. Immediately press and HOLD F 9 key until Boot Manager screen opens.
View attachment 5668
Select your Linux by pressing up or down arrow keys and hi-lite it. {It might say ‘Ubuntu’} then click on your selection.
Ready to install new Linux operating system. Follow onscreen instructions.
View attachment 5670
End of instructions.
____________________________________________________________________________
Attachments
-
 1583493152385.png266.9 KB · Views: 270
 -
 1583493191838.png172.2 KB · Views: 260
 -
 1583493276418.png108.9 KB · Views: 240
 -
 1583493364735.png158.8 KB · Views: 264
 -
 1583493433524.png52.6 KB · Views: 240
 -
 1583493484158.png23.1 KB · Views: 252
 -
 1583493559259.png78.1 KB · Views: 261
 -
 1583493646066.png528.1 KB · Views: 259
 -
 1583493712333.png1.3 MB · Views: 271
 -
 1583493788444.png1,012.9 KB · Views: 260
 -
 1583493914139.png1 MB · Views: 265
 -
 1583494229230.png945.5 KB · Views: 271
 -
 1583494298327.png945.5 KB · Views: 278
 -
 1583494368842.png12.1 MB · Views: 271
 -
 1583494375401.png12.1 MB · Views: 291
Last edited by a moderator:
