J
Jarret W. Buse
Guest
Xenix on Linux
Before Linux existed, there was UNIX. A popular variant of UNIX was Xenix. For historical sake, some people may find it interesting to see Xenix.
In the late 1970's, Microsoft licensed a UNIX-like system from AT&T called XENIX. Microsoft did not sell Xenix to customers, but licensed it to other companies such as IBM, Intel, Santa Cruz Operation (SCO) and others. SCO later bought XENIX from Microsoft and it is now sold as SCO UNIX OpenServer. From 1984 to 1989, Xenix was more widely used than DOS at the time.
To start, there are a few versions of Xenix available; they are abandonware. The versions available were based on the Processor type:
NOTE: Some disk images you find may be labeled as “Installation 1” and not “N1”.
In the set of disks I put together, I have found everything but the Text Processing Disks (T#).
NOTE: If anyone should come across the Text Processing Disk images, please contact me at [email protected].
To start, you need VirtualBox installed on your system and download the Xenix disk images from “http://dcjtech.info/wp-content/uploads/2015/02/Xenix-2.3.1.zip”.
Create a “New” machine in VirtualBox and give it a name. Set the “Type” to “Other” and the “Version” to “Other/Unknown” before pressing “Next”.
Set the RAM to “4 MB” and click “Next”.
Select the option to “Create a Virtual Hard Drive Now” then press “Create”. Select “VDI” and click “Next”. Specify that the drive should be a “Fixed Size” before clicking the “Next” button. Set the name and location of the Virtual Disk file and set the size to “80 MB” before selecting the “Create” button.
Once the Machine is created, select it and then press the “Settings” icon. Select “Motherboard” in the left pane and uncheck the CD/DVD.
Select “Video” in the left pane and then the “Video” tab. Set the Video RAM to “4 MB”.
Under the “Storage” option in the left pane, remove the CD/DVD. A “Floppy Controller” needs to be added and then a “Floppy Device”. Go ahead and select the image file “N1.img” from the Xenix files you downloaded. Select the “OK” button to finish editing the settings. Click the “Start” icon to start the Virtual Machine.
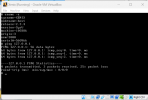
At the initial screen, shown in Figure 1, press “Enter” to continue. You should be prompted to “Insert filesystem floppy and press <RETURN>”. At this point, select “Devices” from the VirtualBox menu and the “Floppy Devices”. At this menu, select “Choose virtual floppy disk file”. A window should open allowing you choose a different location on your system partitions. Locate your folder containing the Xenix disk images and select “N2.img”. Once the new disk image has been selected, press the enter key to have the Xenix system load the new virtual diskette.

FIGURE 1
Next, you should be prompted to enter “Selection” from a menu for your keyboard. Enter a number from one to six which corresponds to your keyboard and press enter.
Next, you are asked if it is okay to overwrite some or all of the hard drive if necessary. Enter a 'y' and press enter.
When prompted for the “Hard Disk Drive 0 Configuration” enter “q” to quit the menu and press enter.
At the next prompt, enter “2” to “use the entire disk for Xenix” and then press enter again. For the next two prompts, enter a “q”.
When prompted, you need to enter a value for bad track allocation. Simply press enter to accept the default of 15. The next prompt is for swap space allocation. Again, press enter for the default.
You are then prompted if you want a separate /u filesystem. Enter “n” and then enter.
When prompted about wanting block-by-block control over the Xenix layout division, enter 'n' and then press enter.
The filesystem should then be made on the hard disk. The system should then be set to restart when you press a key. At this point, go to “Machine”, “Close”, select “Power off the machine” and click “OK”.
Once you are back at the VirtualBox menu, open “Settings” for your Xenix Virtual machine. Go to “System” in the left pane and on the “Motherboard” tab, move the Floppy below the Hard Disk in the Boot Order window. On the Storage option in the left pane, select the Floppy Disk and change the image file back to “N1.img”. Select OK and then the “Start” icon.
After Xenix boots, you should be prompted for the Serial Number. Enter the code “ltd000825” and for the Activation Key enter “ylwbrzan”. The system will save the information and ask to be restarted. Press any key to restart Xenix.
After the reboot, you should be prompted for disk “N3.img”. Change the Floppy Device image file and press enter. The next disk is “B1.img” and then the “B2.img”. Next you are prompted for the “root” password. After less than a minute, you should should be promped for Time Zone information. Enter the prompts as needed.
After the Time Zone has been set, you are shown disk usage information and prompted to Stop the installation at a minimum setup or to Continue. Enter “2” to continue.
Now you are given four options as follows:
Since the download contains the disks for options 1, 2 and 3, let us do those. Enter a “1” to install all the Operating System options.
For the Operating System, you are prompted for disk “X1.img”. After it reads the disk, you are prompted about which package to install. Press “1” and you are given a list of the packages. Simply enter “ALL” at the prompt to install all of the listed packages. You will be prompted for disks “X1.img”, “X2.img”, “X3.img”, “X4.img”, “X5.img”, “X6.img” and “X7.img”.
You are then prompted about the system only containing a root filesystem. Press “y” and enter. Enter a password for “backup” as well as “sysadm”. You are then prompted to enter information about terminfo. You can simply answer “n” and enter. You are then prompted for disk “N2.img”, “N4.img” and “N5.img”. A prompt is then shown for the Link Kit Serial Number and Activation Number. Enter the two numbers as listed before for the Operating System. Insert disk “N6.img”
Now, you are back at the menu to install the Operating System Packages. Enter “6” to select a new set to install. The next set is the Development System. Press “2” and then enter. You are asked to insert “D1.img”. Enter “1” to install one or more packages. Enter “ALL” to install all the Development Software System. The disks from “D1.img” to “D6.img” are required. You will then be prompted for the Serial Number and Activation Number for the Development System. Enter for the Serial Number: “sco005715” and the Activation Number should be “eyxtnkko”. Enter “q” and enter when prompted about “termcap” and then select image “N5.img” and then “N6.img” in the Floppy Device.
Next you should be prompted for the Package installer for the Software Development. Enter “6” again to go back to the main menu. Now, enter a “4” to add another supported package. You will be prompted to insert the disk with the installable data. Change the Floppy Device to “G1.img”. Enter a “1” to see a listing of the contents of the Games Package. Enter “ALL” to install all the listed packages. When done, enter “q” to quit the installation process and restart the system.
Everything should be installed and you now have a Xenix system with all the added features as well as games.
After the system boots up and you press enter at the boot screen, you need to press CONTROL-D to continue with a normal startup. At the login prompt, enter “root” and type the root password you created during the install.
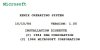
You are now in a fully operational Xenix system as shown in Figure 2. Enjoy.

FIGURE 2
Before Linux existed, there was UNIX. A popular variant of UNIX was Xenix. For historical sake, some people may find it interesting to see Xenix.
In the late 1970's, Microsoft licensed a UNIX-like system from AT&T called XENIX. Microsoft did not sell Xenix to customers, but licensed it to other companies such as IBM, Intel, Santa Cruz Operation (SCO) and others. SCO later bought XENIX from Microsoft and it is now sold as SCO UNIX OpenServer. From 1984 to 1989, Xenix was more widely used than DOS at the time.
To start, there are a few versions of Xenix available; they are abandonware. The versions available were based on the Processor type:
- 8086 – 2.1.3
- 286 – 2.1.3, 2.2.1, 2.3.2
- 386 – 2.2.3, 2.3.4a, 2.3.4q
- SysV 386 – 3.2 4.2
- N – Installation
- B – Basic Utilities
- X – Extended Utilities
- D – Development System
- T – Text Processing
- G – Games
NOTE: Some disk images you find may be labeled as “Installation 1” and not “N1”.
In the set of disks I put together, I have found everything but the Text Processing Disks (T#).
NOTE: If anyone should come across the Text Processing Disk images, please contact me at [email protected].
To start, you need VirtualBox installed on your system and download the Xenix disk images from “http://dcjtech.info/wp-content/uploads/2015/02/Xenix-2.3.1.zip”.
Create a “New” machine in VirtualBox and give it a name. Set the “Type” to “Other” and the “Version” to “Other/Unknown” before pressing “Next”.
Set the RAM to “4 MB” and click “Next”.
Select the option to “Create a Virtual Hard Drive Now” then press “Create”. Select “VDI” and click “Next”. Specify that the drive should be a “Fixed Size” before clicking the “Next” button. Set the name and location of the Virtual Disk file and set the size to “80 MB” before selecting the “Create” button.
Once the Machine is created, select it and then press the “Settings” icon. Select “Motherboard” in the left pane and uncheck the CD/DVD.
Select “Video” in the left pane and then the “Video” tab. Set the Video RAM to “4 MB”.
Under the “Storage” option in the left pane, remove the CD/DVD. A “Floppy Controller” needs to be added and then a “Floppy Device”. Go ahead and select the image file “N1.img” from the Xenix files you downloaded. Select the “OK” button to finish editing the settings. Click the “Start” icon to start the Virtual Machine.
At the initial screen, shown in Figure 1, press “Enter” to continue. You should be prompted to “Insert filesystem floppy and press <RETURN>”. At this point, select “Devices” from the VirtualBox menu and the “Floppy Devices”. At this menu, select “Choose virtual floppy disk file”. A window should open allowing you choose a different location on your system partitions. Locate your folder containing the Xenix disk images and select “N2.img”. Once the new disk image has been selected, press the enter key to have the Xenix system load the new virtual diskette.
FIGURE 1
Next, you should be prompted to enter “Selection” from a menu for your keyboard. Enter a number from one to six which corresponds to your keyboard and press enter.
Next, you are asked if it is okay to overwrite some or all of the hard drive if necessary. Enter a 'y' and press enter.
When prompted for the “Hard Disk Drive 0 Configuration” enter “q” to quit the menu and press enter.
At the next prompt, enter “2” to “use the entire disk for Xenix” and then press enter again. For the next two prompts, enter a “q”.
When prompted, you need to enter a value for bad track allocation. Simply press enter to accept the default of 15. The next prompt is for swap space allocation. Again, press enter for the default.
You are then prompted if you want a separate /u filesystem. Enter “n” and then enter.
When prompted about wanting block-by-block control over the Xenix layout division, enter 'n' and then press enter.
The filesystem should then be made on the hard disk. The system should then be set to restart when you press a key. At this point, go to “Machine”, “Close”, select “Power off the machine” and click “OK”.
Once you are back at the VirtualBox menu, open “Settings” for your Xenix Virtual machine. Go to “System” in the left pane and on the “Motherboard” tab, move the Floppy below the Hard Disk in the Boot Order window. On the Storage option in the left pane, select the Floppy Disk and change the image file back to “N1.img”. Select OK and then the “Start” icon.
After Xenix boots, you should be prompted for the Serial Number. Enter the code “ltd000825” and for the Activation Key enter “ylwbrzan”. The system will save the information and ask to be restarted. Press any key to restart Xenix.
After the reboot, you should be prompted for disk “N3.img”. Change the Floppy Device image file and press enter. The next disk is “B1.img” and then the “B2.img”. Next you are prompted for the “root” password. After less than a minute, you should should be promped for Time Zone information. Enter the prompts as needed.
After the Time Zone has been set, you are shown disk usage information and prompted to Stop the installation at a minimum setup or to Continue. Enter “2” to continue.
Now you are given four options as follows:
- Operating System
- Development System
- Text Processing System
- Add a supported product
Since the download contains the disks for options 1, 2 and 3, let us do those. Enter a “1” to install all the Operating System options.
For the Operating System, you are prompted for disk “X1.img”. After it reads the disk, you are prompted about which package to install. Press “1” and you are given a list of the packages. Simply enter “ALL” at the prompt to install all of the listed packages. You will be prompted for disks “X1.img”, “X2.img”, “X3.img”, “X4.img”, “X5.img”, “X6.img” and “X7.img”.
You are then prompted about the system only containing a root filesystem. Press “y” and enter. Enter a password for “backup” as well as “sysadm”. You are then prompted to enter information about terminfo. You can simply answer “n” and enter. You are then prompted for disk “N2.img”, “N4.img” and “N5.img”. A prompt is then shown for the Link Kit Serial Number and Activation Number. Enter the two numbers as listed before for the Operating System. Insert disk “N6.img”
Now, you are back at the menu to install the Operating System Packages. Enter “6” to select a new set to install. The next set is the Development System. Press “2” and then enter. You are asked to insert “D1.img”. Enter “1” to install one or more packages. Enter “ALL” to install all the Development Software System. The disks from “D1.img” to “D6.img” are required. You will then be prompted for the Serial Number and Activation Number for the Development System. Enter for the Serial Number: “sco005715” and the Activation Number should be “eyxtnkko”. Enter “q” and enter when prompted about “termcap” and then select image “N5.img” and then “N6.img” in the Floppy Device.
Next you should be prompted for the Package installer for the Software Development. Enter “6” again to go back to the main menu. Now, enter a “4” to add another supported package. You will be prompted to insert the disk with the installable data. Change the Floppy Device to “G1.img”. Enter a “1” to see a listing of the contents of the Games Package. Enter “ALL” to install all the listed packages. When done, enter “q” to quit the installation process and restart the system.
Everything should be installed and you now have a Xenix system with all the added features as well as games.
After the system boots up and you press enter at the boot screen, you need to press CONTROL-D to continue with a normal startup. At the login prompt, enter “root” and type the root password you created during the install.
You are now in a fully operational Xenix system as shown in Figure 2. Enjoy.
FIGURE 2
")